
Wondering how to add a contact form to WordPress site to efficiently fulfill your business goals?
The credibility of a website highly depends on a contact form that will let customers connect with you. If they don’t find a way of communication, they will never get the courage to buy anything from your site.
Ignoring adding a contact form means dropping your sales. Don’t think contact forms are only needed for business websites. No matter what type of site you are running, you will need a way to connect with your target audience.
Now, do you know how to build up this connection? No worries if you didn’t add it before, here you will get to know the easiest process of how to add contact form in WordPress.
Benefits of adding a WordPress contact form on your site:
Your customers need a bridge to connect with you after entering your site. It can be through an email or a contact form. But, do you think posting email on your site is a good idea? Of course not. Because publishing email on your site means welcoming thousands or even millions of spam messages. I’m pretty sure you will never want it.
In that case, a contact form can help. Not only for avoiding spam messages but also you will start to get other benefits after adding a contact form on your site. Want to know those benefits? Then, here you go:

Get needed information:
In the contact form, you can add input fields as required. This will help you to get the exact info you need from your customers. For example, if you want to know their contact number then, you can easily add a field for that.
Lead Generation:
This is also a great source of lead generation. Whenever your visitors fill up a contact form you will get a lead for your future email campaign. Besides, you can add a custom field to your contact form that will let you know your potential customers more.
Time-saving:
A contact form can cut out the unnecessary times that you have to spend getting needed info from your customers. You can add necessary fields by marking them as required and you are all set. No need to mail your customers again and again.
Lead management:
You will be happy to know that a contact form will ease your lead management process. As a result, you won’t miss out on customers’ important queries. On the other hand, if you are connecting through email, there is a higher chance of receiving customers’ queries as spam mails.
So, these are the facilities of adding a contact form to your WordPress site. Now let’s come to the main point. It’s time to show you the easiest process of adding a contact form that we have promised at the beginning of the blog.
How to add contact form in WordPress
Adding a contact form won’t take that much of your time if you use the right tool. Even a few minutes will be enough for doing this. Here we will talk about the complete process of adding this contact form. Now let’s get started:
Step 1: Install MetForm to add a WordPress contact form.
In the first step, you need to add MetForm to your site. To do it hover your mouse on the plugins and press “Add new“. After that, search for MetForm in the search box and click on the install now button.
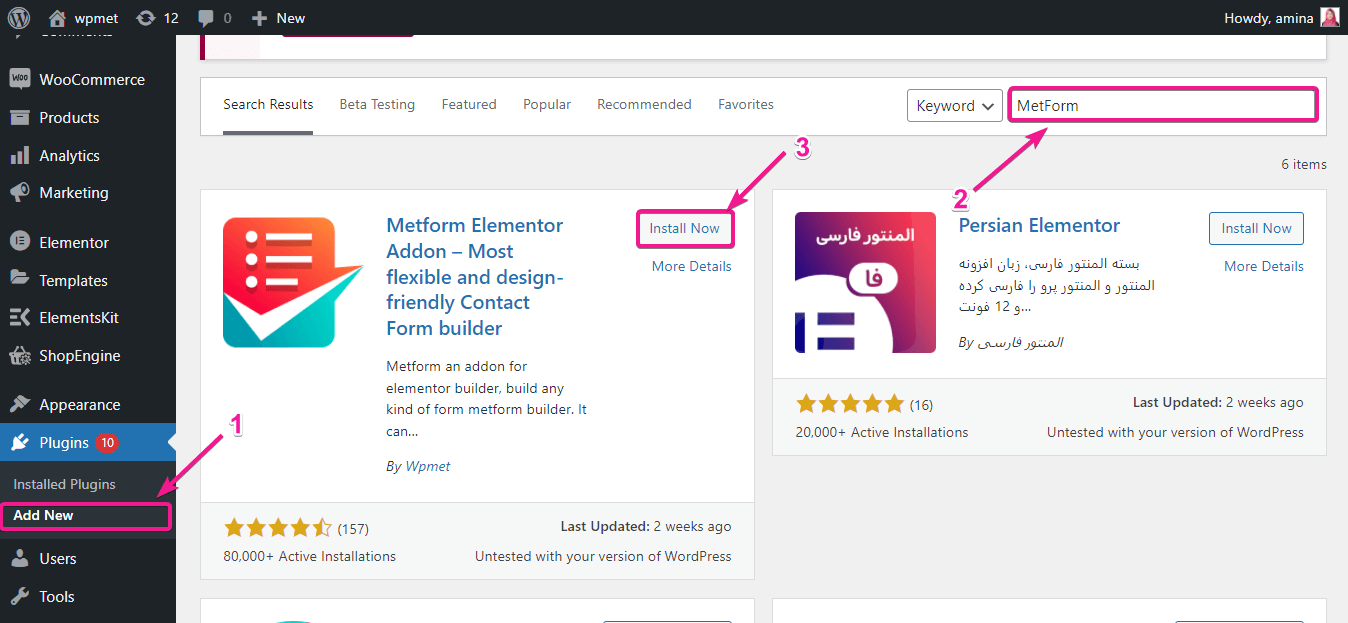
Then, press the activate button to activate MetForm.
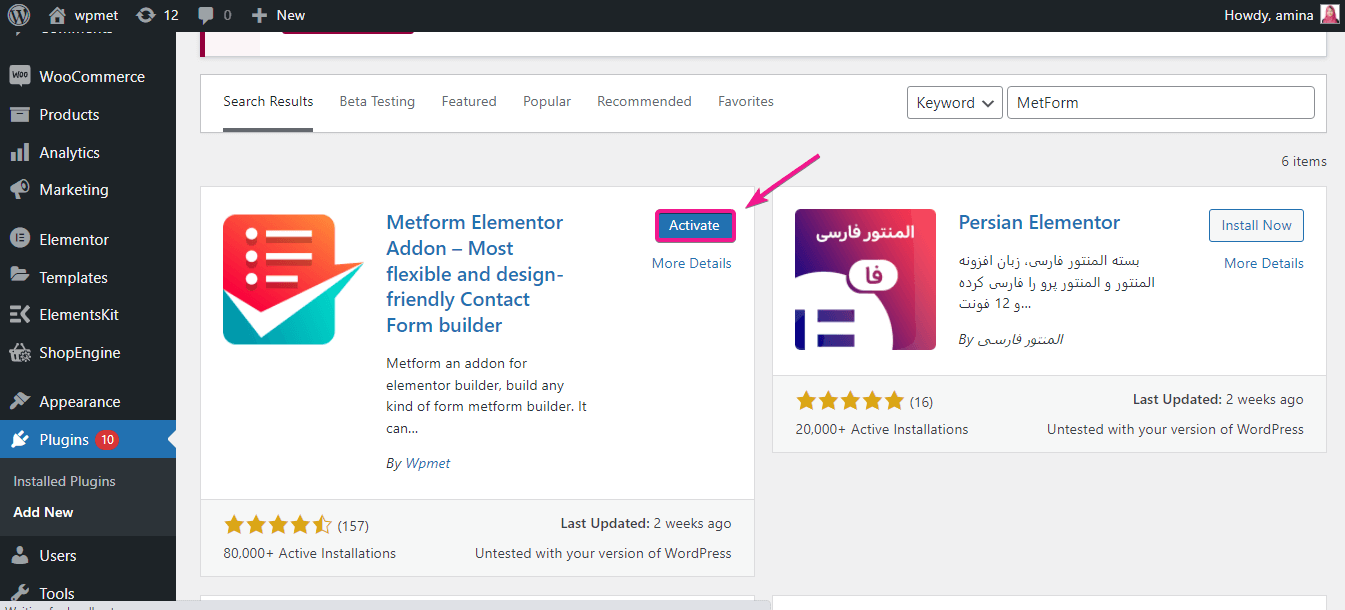
Don’t forget to install Elementor if you don’t have it installed on your WordPress site. Because, to use MetForm, you need to be an Elementor user.
Step 2: Add a new page for the contact form.
After installing MetForm you need to add a page or you can also choose your existing page for adding a form. We will show you how to add contact form in WordPress by adding it to a new page. For doing it, go to pages>> add new.
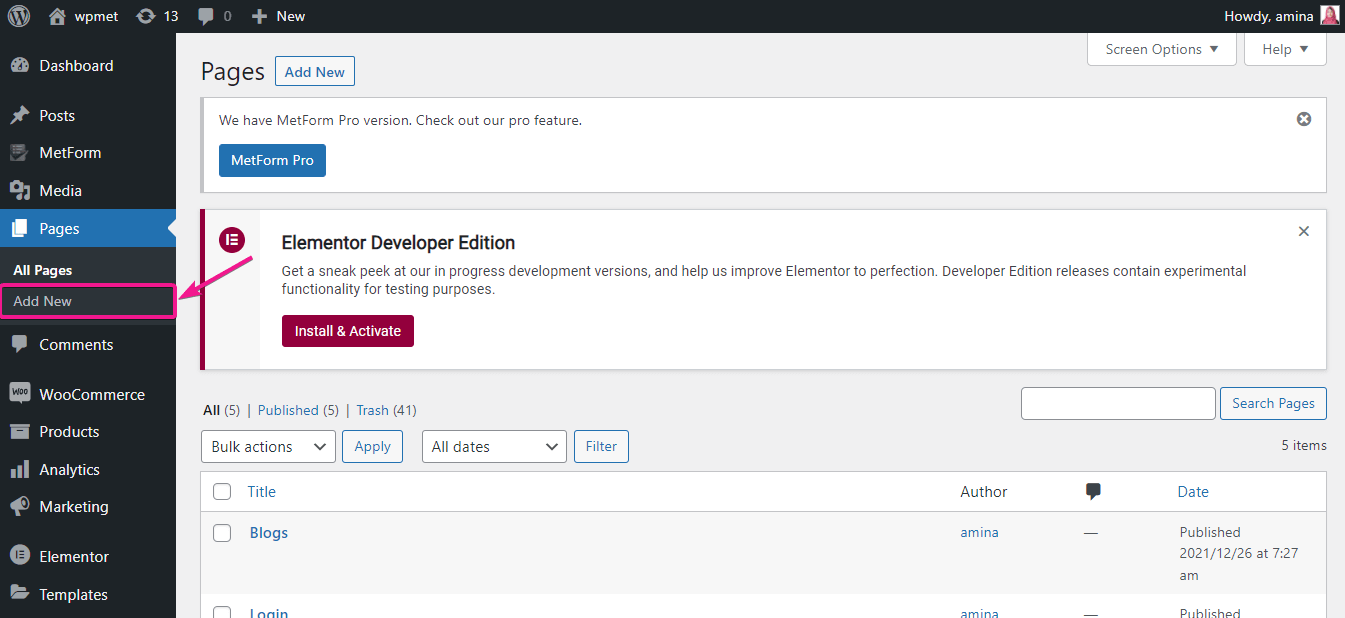
Then, insert a title for your page like the image and click on the Edit with Elementor button.
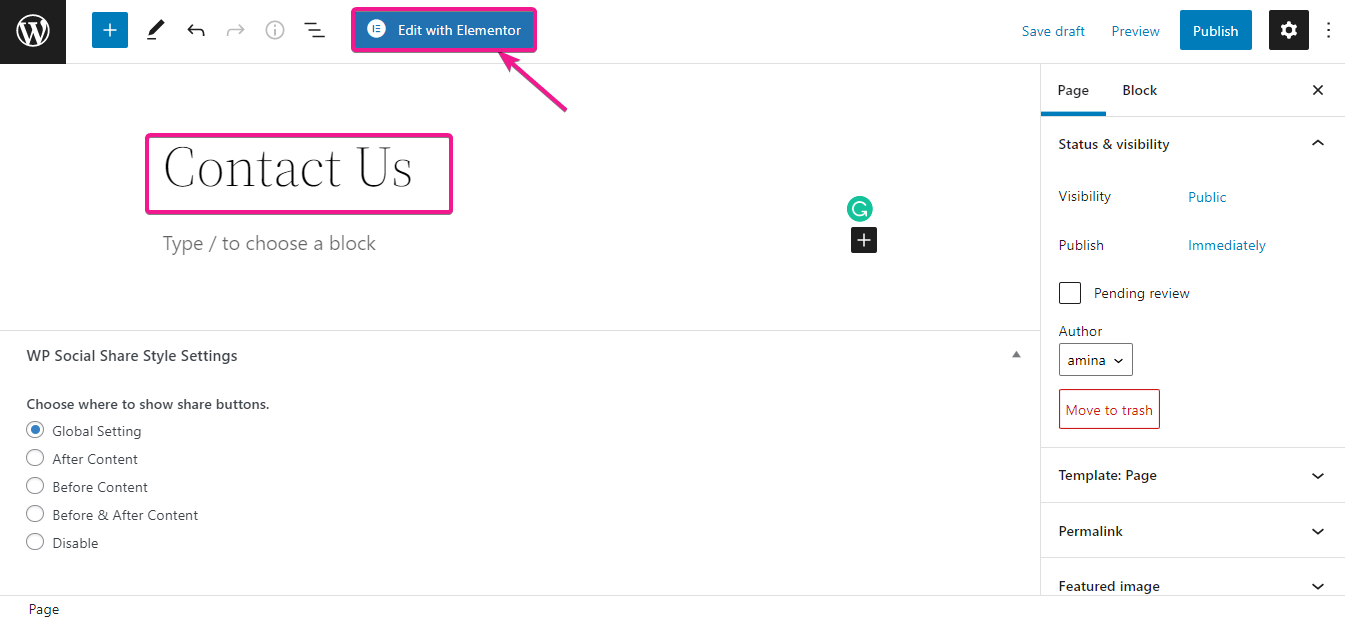
Now, drag and drop MetForm like the gif.
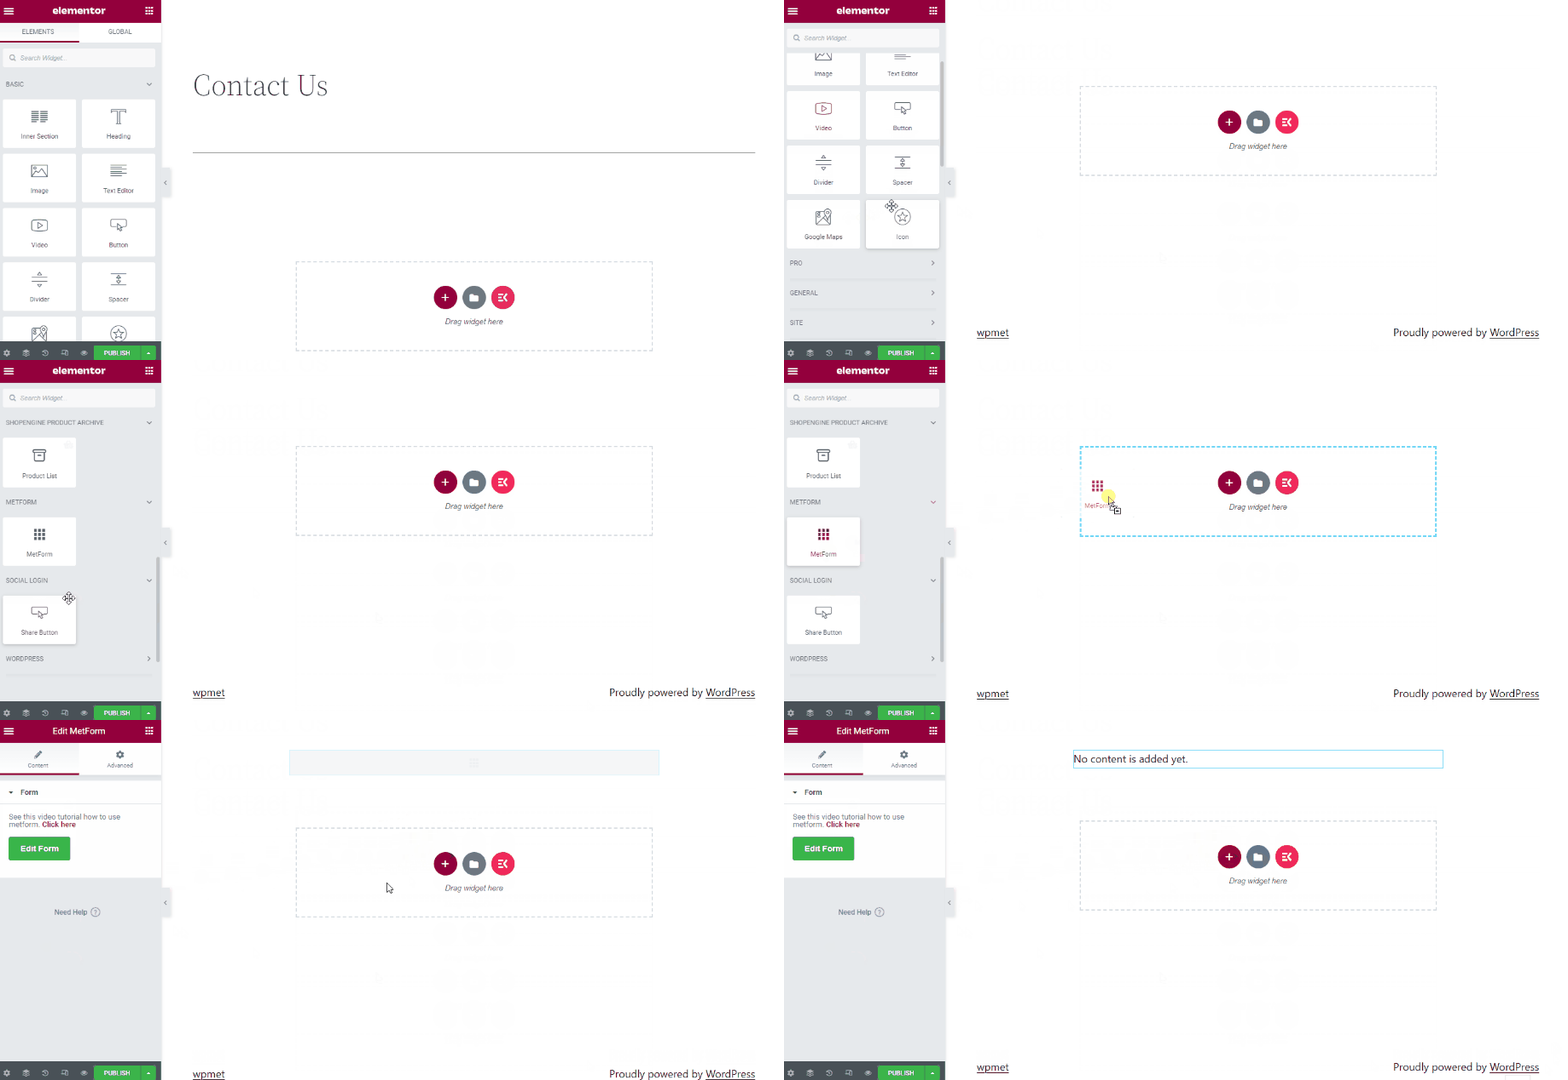
After that, press the Edit Form button and start editing your contact form.
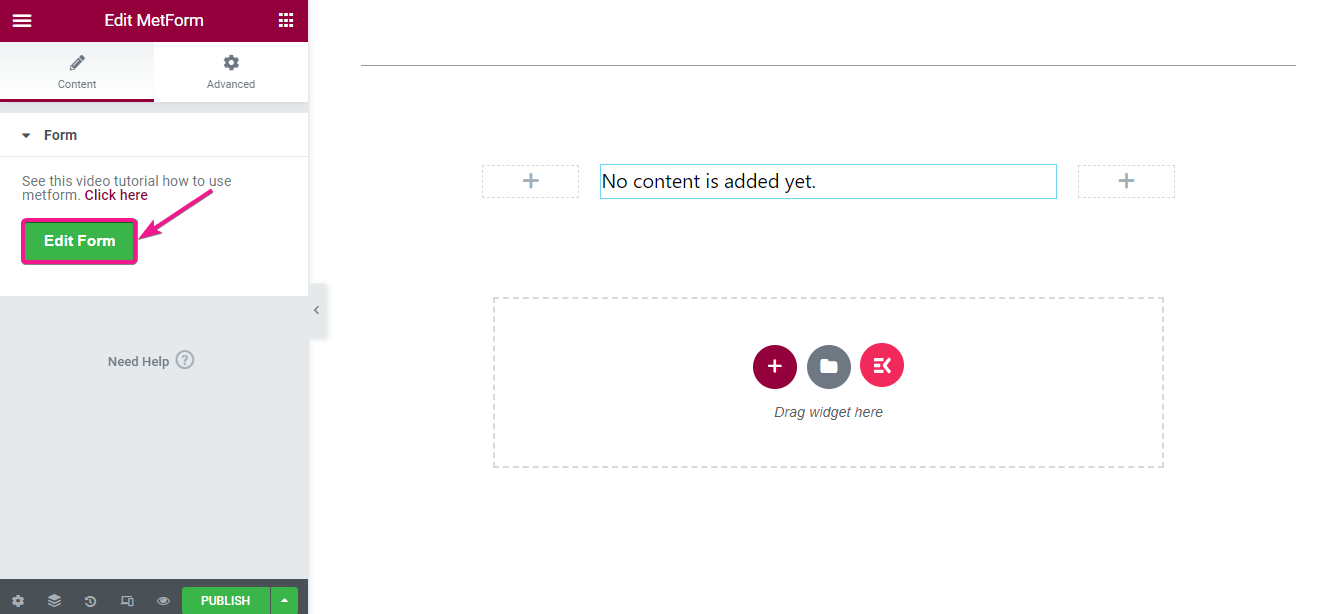
It’s time to choose a template for your WordPress contact form. Here you will find lots of free and pro templates. Select one from these templates. After selecting your template, press the edit form button.
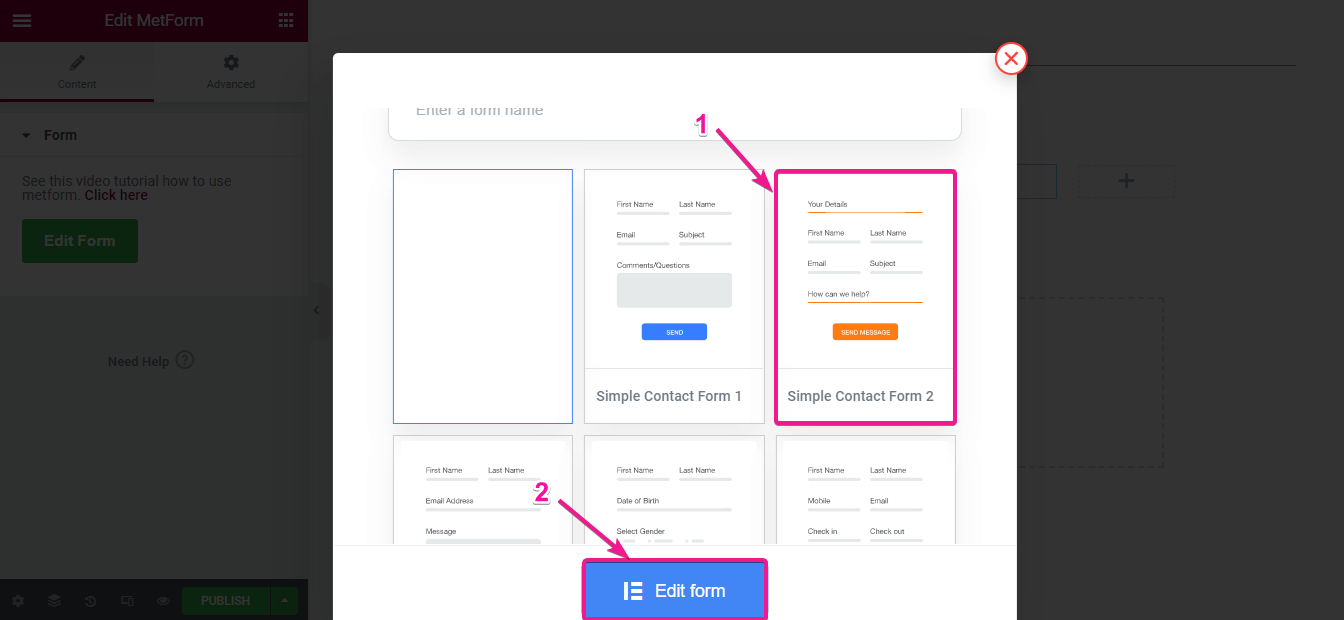
Step 4: Edit the heading of the contact form.
In this part, you need to edit your contact form. To do it click on the heading section like the image and make the changes to the following areas:
- Title: Enter the most suitable title for your contact form.
- Link: This field will let you add a link with the title which helps you to redirect your customers to another page.
- Size: Choose the size of the title from here.
- HTML tag: You need to select the HTML tag for the title.
- Alignment: From here select right, left, or middle alignment for your heading.

Here comes style customization. Edit the title color and typography as your preference and add text shadow if you want to.

Step 5: Customize the inner fields of your contact form.
After editing the title of your WordPress contact form, you need to customize each field on your contact form. The process will be the same as before. Click on the text of your form and make changes to the following areas:
- Show label: Add a label to each inner field. This will help your customers to fill up the form.
- Position: You can choose the label position top or left from here.
- Label: Insert the text you want to show as a label.
- Place holder: This option will show an example of what your customers should insert in this field. Add a suitable place holder.
- Help text: Enter help text for fulfilling the field.
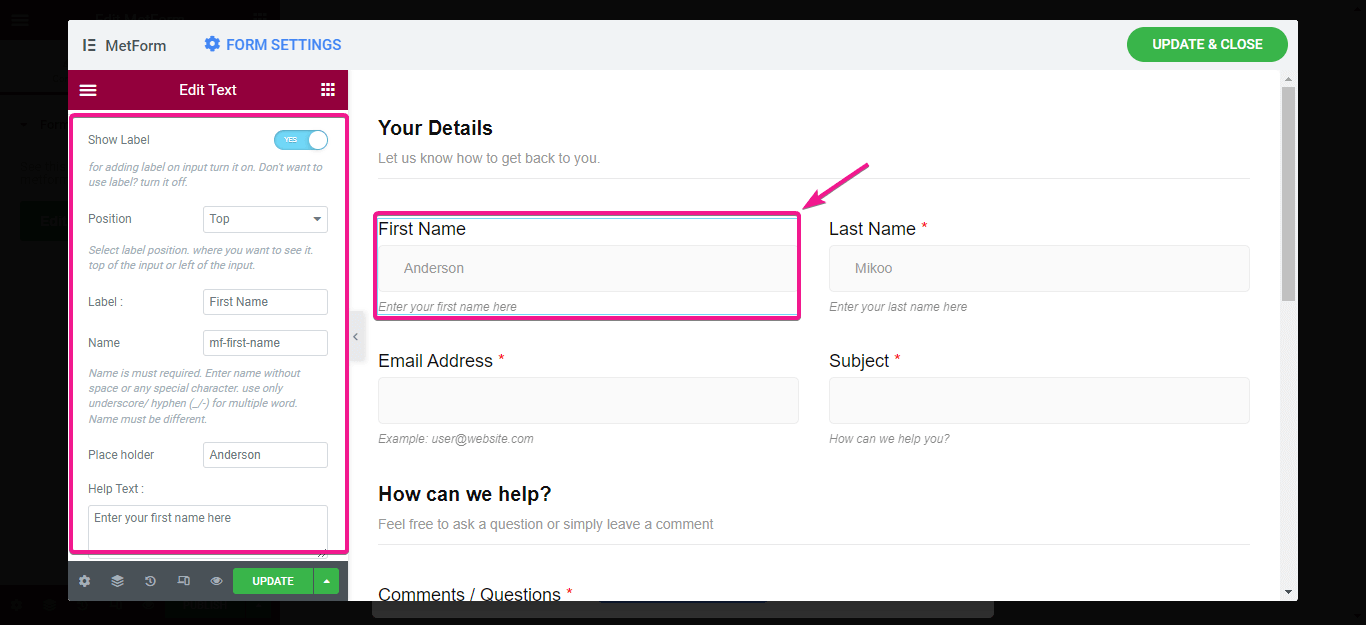
Now you can mark the field as required if it is important for form submission. By doing this, your customers can’t submit the form without filling in the required fields.
To mark the field as required enable the required option. Here you can also add a minimum and maximum length by character or word for your field. Add that if you want and insert a warning message for this required field.

Then, edit the style of the label by changing:
- Color.
- Typography.
- Padding.
- Margin.
- Required indicator color.
- Warning text color.
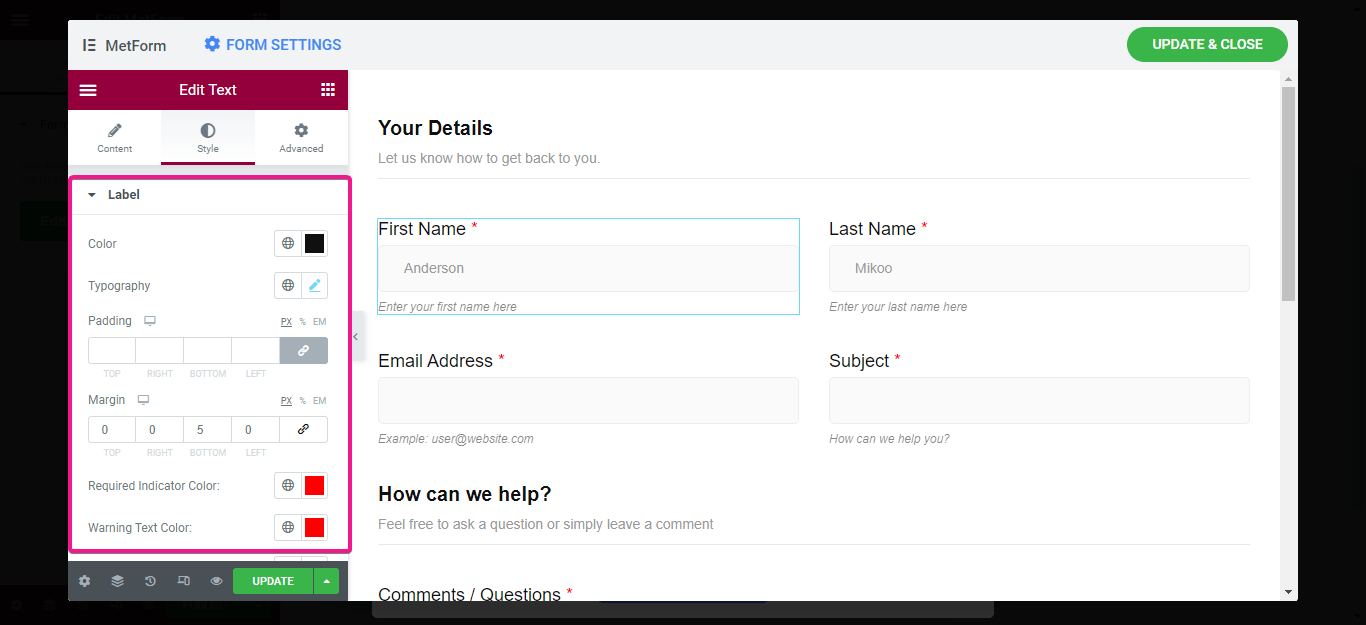
Like the label, make changes for input, place holder, and help text.
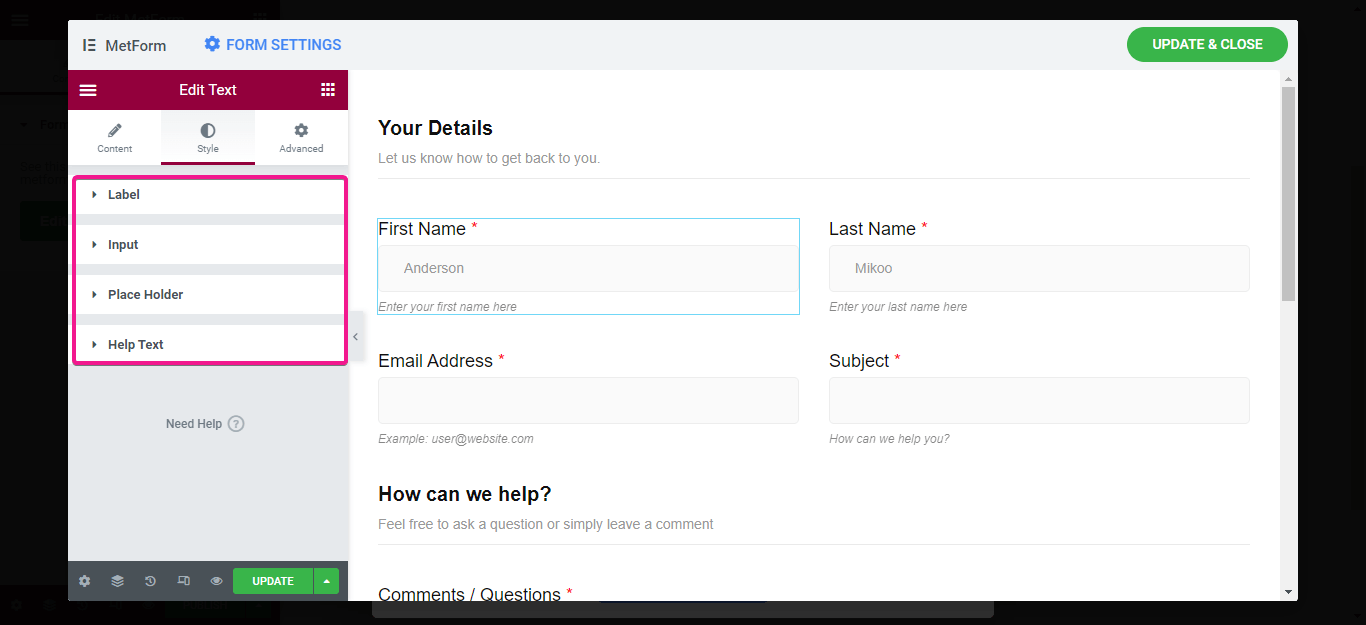
Step 6: Edit the contact form submit button and publish form.
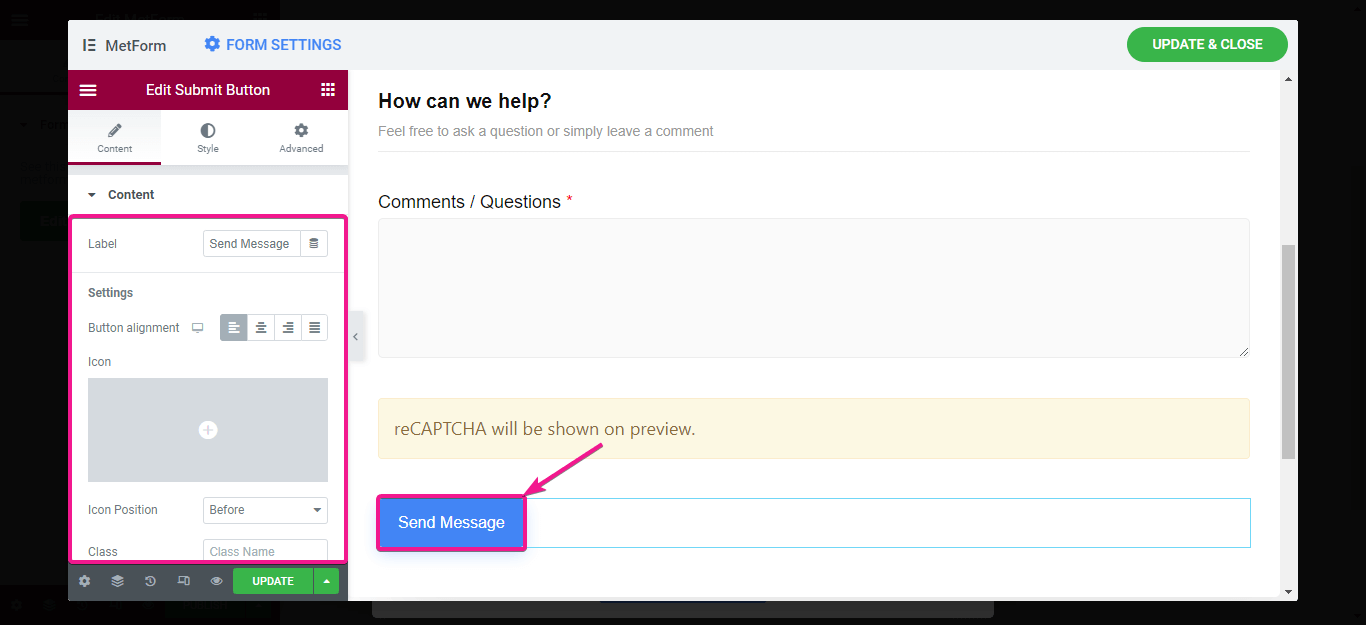
After editing all the inner fields on your contact form, you need to edit the form submission button. For doing it, click on the button and start editing:
- Label: Insert button text here in this field.
- Button alignment: Choose an alignment for your button.
- Icon: You can use an icon for your button. Add it if you want.
- Icon position: Decide the placement of your button icon. You can set it before or after the text.
Finally, do the style customization of your submit button. For it, edit the style of your button, border, shadow, and icon like before. After that, press the update & close button for making all your changes live.
You can also edit your contact form any time you like. Just go to the backend of your form and start editing.
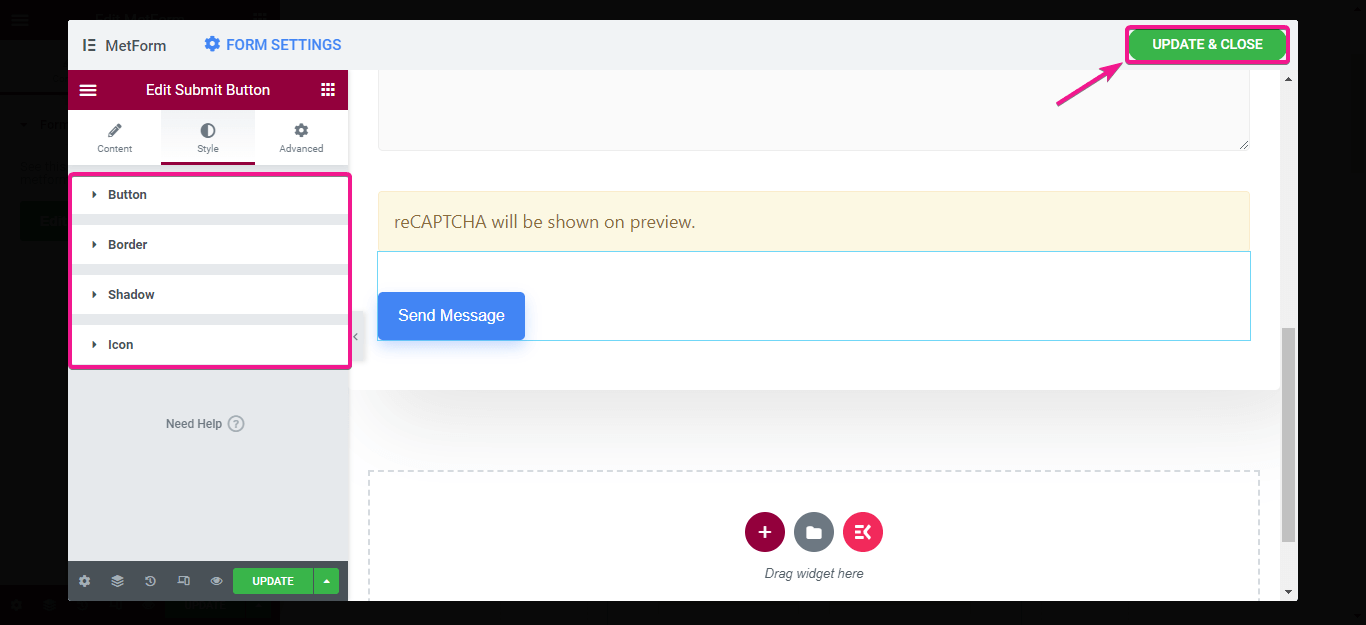
The final look of your WordPress contact form

Get Started with your contact form
Since you know the quickest process of how to add contact form in WordPress. Why not try it now? Add a contact form by following the above 6 steps and you are all set. Since MetForm is a highly user-friendly plugin, you can build the whole form with an easy Elementor drag and drop feature. Not only contact form but also you can build any form with this form builder such as multi-step, engaging vacancy application form, etc. However, you can comment down for any query and also let us know if you could successfully add a contact form to your site.

